Experiments with ruby-processing (processing-2.2.1) and JRubyArt for processing-3.0

Showing posts with label processing. Show all posts

Thursday, 30 July 2015

Ruby-Processing now using pry for live coding mode

The latest release of ruby-processing uses pry for live coding, and this is genuinely exciting. Here is a live mode for a class wrapped jwishy.rb sketch, which I have listed in the pry console using '$' command (NB: click on images to see full size):-

This is all the class wrapping needed

class JWishy < Processing::App
  # bare sketch code
end
Bare sketches instead get listed as the super class, but to be honest listing of the code in the pry console is not that exciting see embedded video, the exciting bit is to be able to futz with sketch code from the console and watch it affect the running console (but why not try it for yourself). In the "Wishy Worm" example we change the background of the sketch by changing the @back_color variable, and change the bluish accessor method to a custom method that returns bluish as function of the y_wiggle variable

But you can do so much more, including 'ls' available methods, and remember pry has a built in help...


live from monkstone on Vimeo.

Live coding in ruby-processing now using pry

Bounce.rb code used in video
You should also checkout the pry 'edit' function, which allows you to use your favourite editor to edit a method say 'JWishy#draw'

Sunday, 5 April 2015

Replacing Processing::Proxy in ruby-processing

I have often thought that Processing::Proxy in ruby-processing is a bit of hack (further it doesn't always do what you need to mimic vanilla processings "inner" class access to methods/variables), here is a more respectable alternative using forwardable. As a bonus shows the neat Vec3D :to_vertex method in action:-
require 'forwardable'
load_libraries :icosahedron, :vecmath

def setup
  size 640, 360, P3D
  @ico1 = Icosahedron.new self, 75.0
  @ico2 = Icosahedron.new self, 75.0
  @ico3 = Icosahedron.new self, 75.0
end

def draw
  background 0
  lights
  translate(width / 2, height / 2)
  push_matrix
  translate(-width / 3.5, 0)
  rotate_x frame_count * PI / 185
  rotate_y frame_count * PI / -200
  stroke 170, 0, 0
  no_fill
  @ico1.draw
  pop_matrix
  push_matrix
  rotate_x frame_count * PI / 200
  rotate_y frame_count * PI / 300
  stroke 170, 0, 180
  fill 170, 170, 0
  @ico2.draw
  pop_matrix
  push_matrix
  translate(width / 3.5, 0)
  rotate_x frame_count * PI / -200
  rotate_y frame_count * PI / 200
  no_stroke
  fill 0, 0, 185
  @ico3.draw
  pop_matrix
end
Here is the library class that uses forwardable:-
# Example of replacing Processing::Proxy with extend Forwardable
# And using Vec3D :to_vertex function
class Icosahedron
  extend Forwardable   # replacing Processing::Proxy mixin
  def_delegators(:@app, :begin_shape, :end_shape)
  attr_reader :r, :app, :renderer

  def initialize(app, radius)
    @r = radius
    @app = app
    @renderer = AppRender.new(app)
  end

  ##
  # Draw an icosahedron defined by a radius r.
  #
  def draw
    # Calculate vertex data for an icosahedron inscribed by a sphere radius 'r'.
    # Use 4 Golden Ratio rectangles as the basis.
    phi = (1.0 + Math.sqrt(5.0)) / 2.0
    h = r / Math.sqrt(1.0 + phi * phi)
    v =
    [
      Vec3D.new(0, -h, h * phi), Vec3D.new(0, -h, -h * phi),
      Vec3D.new(0, h, -h * phi), Vec3D.new(0, h, h * phi),
      Vec3D.new(h, -h * phi, 0), Vec3D.new(h, h * phi, 0),
      Vec3D.new(-h, h * phi, 0), Vec3D.new(-h, -h * phi, 0),
      Vec3D.new(-h * phi, 0, h), Vec3D.new(-h * phi, 0, -h),
      Vec3D.new(h * phi, 0, -h), Vec3D.new(h * phi, 0, h)
    ]

    begin_shape(Java::ProcessingCore::PConstants::TRIANGLES)
    draw_triangle(v[0], v[7], v[4])
    draw_triangle(v[0], v[4], v[11])
    draw_triangle(v[0], v[11], v[3])
    draw_triangle(v[0], v[3], v[8])
    draw_triangle(v[0], v[8], v[7])
    draw_triangle(v[1], v[4], v[7])
    draw_triangle(v[1], v[10], v[4])
    draw_triangle(v[10], v[11], v[4])
    draw_triangle(v[11], v[5], v[10])
    draw_triangle(v[5], v[3], v[11])
    draw_triangle(v[3], v[6], v[5])
    draw_triangle(v[6], v[8], v[3])
    draw_triangle(v[8], v[9], v[6])
    draw_triangle(v[9], v[7], v[8])
    draw_triangle(v[7], v[1], v[9])
    draw_triangle(v[2], v[1], v[9])
    draw_triangle(v[2], v[10], v[1])
    draw_triangle(v[2], v[5], v[10])
    draw_triangle(v[2], v[6], v[5])
    draw_triangle(v[2], v[9], v[6])
    end_shape
  end

  def draw_triangle(p1, p2, p3)
    p1.to_vertex(renderer)
    p2.to_vertex(renderer)
    p3.to_vertex(renderer)
  end
end

Thursday, 2 April 2015

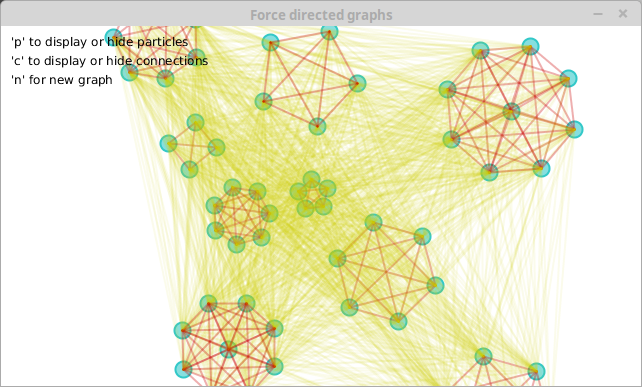
Using delegators in JRubyArt (where vanilla processing uses inner classes)

Using delegators in JRubyArt (where vanilla processing uses inner classes) and ruby-processing uses 'include Processing::Proxy' to mimic the same behaviour. See node.rb, where we selectively expose PApplets fill, stroke, stroke_weight and ellipse methods in the Node class.


force_directed_graph.rb
require 'jruby_art'
require 'toxiclibs'
require_relative 'cluster'
require_relative 'node'

#
# Copyright (c) 2010 Daniel Shiffman
#
# This demo & library is free software you can redistribute it and/or
# modify it under the terms of the GNU Lesser General Public
# License as published by the Free Software Foundation either
# version 2.1 of the License, or (at your option) any later version.
#
# http://creativecommons.org/licenses/LGPL/2.1/
#
# This library is distributed in the hope that it will be useful,
# but WITHOUT ANY WARRANTY without even the implied warranty of
# MERCHANTABILITY or FITNESS FOR A PARTICULAR PURPOSE.  See the GNU
# Lesser General Public License for more details.
#
# You should have received a copy of the GNU Lesser General Public
# License along with this library if not, write to the Free Software
# Foundation, Inc., 51 Franklin St, Fifth Floor, Boston, MA  02110-1301  USA
class ForceDirectedGraph < Processing::App
  attr_reader :physics, :clusters, :show_physics, :show_particles, :f

  def setup
    size(640, 360)
    @f = create_font('Georgia', 12, true)
    @show_physics = true
    @show_particles = true
    # Initialize the physics
    @physics = Physics::VerletPhysics2D.new
    physics.set_world_bounds(Toxi::Rect.new(10, 10, width - 20, height - 20))
    # Spawn a new random graph
    new_graph
  end

  # Spawn a new random graph
  def new_graph
    # Clear physics
    physics.clear
    center = TVec2D.new(width / 2, height / 2)
    @clusters = (0..8).map { Cluster.new(physics, rand(3..8), rand(20..100), center) }
    # All clusters connect to all clusters
    clusters.each_with_index do |ci, i|
      clusters[i + 1..clusters.size - 1].each do |cj|
        ci.connect(cj)
      end
    end
  end

  def draw
    # Update the physics world
    physics.update
    background(255)
    # Display all points
    clusters.each(&:display) if show_particles
    # If we want to see the physics
    if show_physics
      clusters.each_with_index do |ci, i|
        ci.internal_connections self
        # Cluster connections to other clusters
        clusters[1 + i..clusters.size - 1].each do |cj|
          ci.show_connections(self, cj)
        end
      end
    end
    # Instructions
    fill(0)
    text_font(f)
    text("'p' to display or hide particles\n'c' to display or hide connections\n'n' for new graph", 10, 20)
  end

  # Key press commands
  def key_pressed
    case key
    when 'c'
      @show_physics = !show_physics
      @show_particles = true unless show_physics
    when 'p'
      @show_particles = !show_particles
      @show_physics = true unless show_particles
    when 'n'
      new_graph
    end
  end
end

ForceDirectedGraph.new(title: 'Force directed graphs')

cluster.rb
#
# Copyright (c) 2010 Daniel Shiffman
#
# This demo & library is free software you can redistribute it and/or
# modify it under the terms of the GNU Lesser General Public
# License as published by the Free Software Foundation either
# version 2.1 of the License, or (at your option) any later version.
#
# http://creativecommons.org/licenses/LGPL/2.1/
#
# This library is distributed in the hope that it will be useful,
# but WITHOUT ANY WARRANTY without even the implied warranty of
# MERCHANTABILITY or FITNESS FOR A PARTICULAR PURPOSE.  See the GNU
# Lesser General Public License for more details.
#
# You should have received a copy of the GNU Lesser General Public
# License along with this library if not, write to the Free Software
# Foundation, Inc., 51 Franklin St, Fifth Floor, Boston, MA  02110-1301  USA
class Cluster
  attr_reader :nodes, :diameter, :physics

  # We initialize a with a number of nodes, a diameter, and centerpoint
  def initialize(physics, n, d, center)
    @physics = physics
    @diameter = d
    @nodes = (0..n).map { Node.new(center.add(TVec2D.random_vector)) }
    # Connect all the nodes with a Spring
    nodes[1..nodes.size - 1].each_with_index do |pi, i|
      nodes[0..i].each do |pj|
        physics.add_spring(Physics::VerletSpring2D.new(pi, pj, diameter, 0.01))
      end
    end
  end

  def display
    nodes.each(&:display)
  end
  # This functons connects one cluster to another
  # Each point of one cluster connects to each point of the other cluster
  # The connection is a "VerletMinDistanceSpring"
  # A VerletMinDistanceSpring is a spring which only enforces its rest length if the
  # current distance is less than its rest length. This is handy if you just want to
  # ensure objects are at least a certain distance from each other, but don't
  # care if it's bigger than the enforced minimum.

  def connect(other)
    other_nodes = other.nodes
    nodes.each do |pi|
      other_nodes.each do |pj|
        physics.add_spring(Physics::VerletMinDistanceSpring2D.new(pi, pj, (diameter + other.diameter) * 0.5, 0.05))
      end
    end
  end

  # Draw all the internal connections
  def internal_connections(app)
    app.stroke(200, 0, 0, 80)
    nodes[0..nodes.size - 1].each_with_index do |pi, i|
      nodes[i + 1..nodes.size - 1].each do |pj|
        app.line(pi.x, pi.y, pj.x, pj.y)
      end
    end
  end

  # Draw all the connections between this and another Cluster
  def show_connections(app, other)
    app.stroke(200, 200, 0, 20)
    app.stroke_weight(2)
    other_nodes = other.nodes
    nodes.each do |pi|
      other_nodes[0..other_nodes.size - 1].each do |pj|
        app.line(pi.x, pi.y, pj.x, pj.y)
      end
    end
  end
end

node.rb
require 'forwardable'

# The Nature of Code
# Daniel Shiffman
# http://natureofcode.com
# Force directed graph
# Heavily based on: http://code.google.com/p/fidgen/
# Notice how we are using inheritance here!
# We could have just stored a reference to a VerletParticle object
# inside the Node class, but inheritance is a nice alternative
class Node < Physics::VerletParticle2D
  extend Forwardable
  def_delegators(:@app, :fill, :stroke, :stroke_weight, :ellipse)
  def initialize(pos)
    super(pos)
    @app = $app
  end

  # All we're doing really is adding a display function to a VerletParticle
  def display
    fill(50, 200, 200, 150)
    stroke(50, 200, 200)
    stroke_weight(2)
    ellipse(x, y, 16, 16)
  end
end

Monday, 24 November 2014

Radical Proxy experiment for JRubyArt

Here I create a custom (abstract) Proxy class as a java extension for JRubyArt, which when appropriately initialized, gives implementing classes access to processing pre(), draw() and post() loops. With example usage (by a custom Array class), note the empty draw loop.... It probably doesn't matter whether the particle gets updated in pre(), draw() or post() loops. See original vanilla processing code in action here as js version. Note how each module/particle has it's own copy of the update and draw code in those versions. Whereas in JRubyArt a single object, the custom array has this code, and the particle is just a simple Struct.
package processing.core;

/**
 *
 * @author Martin Prout
 */
public abstract class Proxy {

    private final PApplet app;

    /**
     * Useful accessors
     */
    public int width, height;

    /**
     *
     * @param app Applet
     */
    public Proxy(PApplet app) {
        this.app = app;
        this.width = app.width;
        this.height = app.height;
        setActive(true);
    }

    /**
     * Extending classes must implement
     */
    public abstract void pre();

    /**
     * Extending classes must implement
     */
    public abstract void draw();

    /**
     * Extending classes must implement
     */
    public abstract void post();

    private void setActive(boolean active) {
        if (active) {
            this.app.registerMethod("pre", this);
            this.app.registerMethod("draw", this);
            this.app.registerMethod("post", this);
            this.app.registerMethod("dispose", this);
        } else {
            this.app.unregisterMethod("pre", this);
            this.app.unregisterMethod("draw", this);
            this.app.unregisterMethod("post", this);
        }
    }

    /**
     * Simple signature
     * @param col
     */
    public void background(int col) {
        this.app.background(col);
    }

    /**
     * Simple signature
     * @param col
     */
    public void fill(int col) {
        this.app.fill(col);
    }

    /**
     * Simple signature
     * @param col
     */
    public void stroke(int col) {
        this.app.stroke(col);
    }

    /**
     * Access applet if we must
     * @return
     */
    public PApplet app() {
        return this.app;
    }

    /**
     * required for processing
     */
    public void dispose() {
        setActive(false);
    }
}

# Demonstrates possible syntax for creating a custom array of objects.

UNIT = 40
attr_reader :custom_array

def setup
  size 640, 360
  wide_count = width / UNIT
  height_count = height / UNIT
  @custom_array = CustomArray.new(self)
  height_count.times do |i|
    wide_count.times do |j|
      custom_array.add_object(j * UNIT, i * UNIT, UNIT / 2, UNIT / 2, rand(0.05..0.8))
    end
  end
  no_stroke
end

def draw
end

# The Particle object

Particle = Struct.new(:x, :y, :mx, :my, :size, :speed, :xdir, :ydir)

require 'forwardable'

# The custom Array (that can access pre, post and draw loops by reflection)
# Also Proxy has access to background(int), fill(int) and stroke(int)
class CustomArray < Java::ProcessingCore::Proxy
  extend Forwardable
  def_delegators(:@objs, :each, :<<)
  include Enumerable

  attr_reader :app

  def initialize(app)
    @app = app
    @objs = []
  end

  def add_object(mx, my, x, y, speed)
    self << Particle.new(x.to_i, y.to_i, mx, my, UNIT, speed, 1, 1)
  end

  def post
    each do |obj|
      update_x obj
      next unless obj.y >= UNIT || obj.x <= 0
      obj.ydir *= -1
      obj.y += obj.ydir
    end
  end

  def update_x(obj)
    obj.x += obj.speed * obj.xdir
    return if (0..UNIT).cover? obj.x
    obj.xdir *= -1
    obj.x += obj.xdir
    obj.y += obj.ydir
  end

  def pre
  end

  def draw
    background(0)
    fill(255)
    each do |obj|
      app.ellipse(obj.mx + obj.x, obj.my + obj.y, 6, 6)
    end
  end
end

JRubyArt is a development branch of ruby-processing, that is currently going its own way (ie somewhat different implementation)

Monday, 6 October 2014

JRubyArt shader sketch running from netbeans

Probably the most convenient way to explore glsl shader sketches from ruby is to use NetBeans with jruby-plugin, jruby_art gem (and optionally c/c++ plugin). Made possible by Andrés Colubri processing opengl work, tutorial here:-

Saturday, 4 October 2014

Rubygems with latest JRubyArt

With regular ruby-processing, the only way to use gems was to use an installed version of jruby (well apart from using some complicated bundler tool). Interestingly currently you seem to be able to use jruby-complete to launch a sketch with JRubyArt (providing youve've installed the gem with your installed jruby). Now the interest in using jruby-complete is all about being able to run sketches that load_image, shaders etc. Many sketches run just fine with an installed jruby.
                                                   
java -jar jruby-complete game_of_life.rb                                    

Here is the sketch
# game_of_life.rb featuring MDArray in ruby-processing
# A Processing implementation of Game of Life
# By Joan Soler-Adillon
#
# Press SPACE BAR to pause and change the cell's values with the mouse
# On pause, click to activate/deactivate cells
# Press R to randomly reset the cells' grid
# Press C to clear the cells' grid
#
# The original Game of Life was created by John Conway in 1970.
#
require 'jruby_art'
require 'mdarray'

class GameOfLife < Processing::App
  CELL_SIZE = 5
  ALIVE = true
  DEAD = false
  ALIVE_START = 150
  WIDTH = 960
  HEIGHT = 640
  SKIP = 10
  INTERVAL = 100

  attr_reader :pause, :cells, :row, :column, :last_time, :alive, :cells_buffer

  def setup
    size WIDTH, HEIGHT
    @row = WIDTH / CELL_SIZE
    @column = HEIGHT / CELL_SIZE
    background 0
    stroke_weight 2
    @last_time = 0
    @pause = false
    @cells = MDArray.boolean([row, column], random_data)
    @alive = color(100, 255, 100)
    stroke(48, 100)
    no_smooth
  end

  def draw
    background(0)
    # Draw live cells
    (0...row).each do |x|
      (0...column).each do |y|
        if cells.get([x, y])
          fill(alive)
          rect(x * CELL_SIZE, y * CELL_SIZE, CELL_SIZE, CELL_SIZE)
        end
      end
    end
    # Iterate if timer ticks
    unless pause
      tick!
      @last_time = millis
    end if millis - last_time > INTERVAL

    # Create  new cells manually on pause
    if pause && mouse_pressed?
      # Map and avoid out of bound errors (use map1d range and range.clip)
      x_cell_over = (map1d(mouse_x, (0..width), (0..row))).to_i
      x_cell_over = (0..row - 1).clip(x_cell_over)
      y_cell_over = (map1d(mouse_y, (0..height), (0..column))).to_i
      y_cell_over = (0..column - 1).clip(y_cell_over)

      # Check against cells in buffer
      if cells_buffer.get([x_cell_over, y_cell_over])  # Cell is alive
        cells.set([x_cell_over, y_cell_over], DEAD) # Kill
        fill(0) # reflect changed status
      else  # Cell is dead
        cells.set([x_cell_over, y_cell_over], ALIVE) # Make alive
        fill(alive) # Fill alive color
      end

    elsif pause && !mouse_pressed?  # And then save to buffer once mouse goes up
      # Save cells to buffer (so we operate with one array keeping the other intact)
      @cells_buffer = cells.copy
    end
  end

  def tick!  # When the clock ticks
    # Save cells to buffer (so we operate with one array keeping the other intact)
    @cells_buffer = cells.copy
    # Visit each cell:
    (0...row).each do |x|
      (0...column).each do |y|
        # And visit all the neighbours of each cell
        neighbours = 0 # We'll count the neighbours
        (x - 1..x + 1).each do |xx|
          (y - 1..y + 1).each do |yy|
            # Make sure you are not out of bounds
            next unless [(xx >= 0), (xx < row), (yy >= 0), (yy < column)].all? { |in_bounds| in_bounds == true }
            # Make sure to check against self
            unless [(xx == x), (yy == y)].all? { |is_self| is_self == true }
              if cells_buffer.get([xx, yy]) # true == ALIVE
                neighbours += 1 # Check alive neighbours and count them
              end # alive
            end # End of if self
          end # End of yy loop
        end # End of xx loop
        # We've checked the neighbours: apply rules in one line (only in ruby)!
        cells.set([x, y], (cells_buffer.get([x, y])) ? ((2..3) === neighbours) : (neighbours == 3))
      end # End of y loop
    end # End of x loop
  end # End of function

  def key_pressed
    case key
    when 'r', 'R'
      # Restart: reinitialization of cells
      @cells = MDArray.boolean([row, column], random_data)
    when ' ' # On/off of pause
      @pause = !pause
    when 'c', 'C' # Clear all
      @cells = MDArray.boolean([row, column], DEAD)
    end
  end

  def random_data
    (0...row * column).map { rand(1000) < ALIVE_START }
  end
end

GameOfLife.new(title: 'Game of Life mdarray version')

Alternative Ruby-Processing implementation

Currently I am working on a new version of JRubyArt to create an alternative ruby wrapper for processing (to ruby-processing).
  • Sketches run as regular ruby scripts (just need jruby)
  • Vecmath libraries developed for ruby-processing built in
  • You can use Netbeans-8.0.1 to develop and run sketches
  • From netbeans you load and use other gems with your sketches
  • Has a blank sketch creator built in
  • Is in development (yet to support opengl sketches, libraries)
Some sketches as with regular ruby-processing (load image etc) require jruby-complete to run, but with netbeans this is not a problem:-


Sunday, 28 September 2014

Running ribiprocessing from netbeans

Above is a screenshot of me running seeking_neural.rb from Netbeans using ribiprocessing,a really lighweight wrapper for processing. To do this all I needed was the netbeans ruby plugin and then to install (to netbeans) the local gem ribiprocessing-0.1.0.gem.

Monday, 15 September 2014

Include Processing::Proxy to mimic the processing inner classes

If you have been using processing for some time, then you should be aware of the inner classes used by processing to make variables/methods available across classes (strictly non OOP but convenient). In the processing ide, the use of java inner classes is hidden (because the code is post-processed). However if you look at the generated java you will find that if you create a class in the processing ide, it becomes an inner class. Use of the inner class is there to allow easy access to the methods and variables of the outer class (your sketch). If you graduated from using the processing ide to using Eclipse (see tutorial) or Netbeans (other ides are available) you will know that when you create a new java class you can't use the methods and variables, unless you call the instance of the PApplet from you sketch (typically a PApplet variable parent created in your new class, and the class constructor is used to initialize that variable). To give a similar level of access to that provided by processings inner classes you should include the ruby processing Processing::Proxy module in your sketches (however sketch width, and height are not available). The more 'pure' way to to provide such access is to copy the "Eclipse" way of accessing these variables and methods, and that is what you "should" do to access sketch width and height. The "dirty" way to do it is access the sketches '$app' global variable "width = $app.width" for example. A template for creating Processing::Proxy class (in a separate file) is included in ruby-processing:-
rp5 create inner_class --inner

Of course you will give a different more relevant name to your inner classes!!
Then vim inner_class.rb, other editors are available

class InnerClass
  include Processing::Proxy
end

Monday, 1 September 2014

Getting started with ruby-processing for ruby purists

Previously in my post getting started for wizards I showed how to create a sketch that would be more familiar to people coming from processing to ruby-processing. The sketch does not need to be explicitly wrapped as a class (that extends from Processing::App), since ruby-processing does that for you under the hood. This is the DSL approach to writing ruby-processing sketches which I favour, and makes it easier to read across from other processing modes to ruby-processing. However since ruby-processing-2.6.0 it is just as easy to create a classical sketch.
rp5 create classic_sketch 200 200 --wrap
rp5 watch classic_sketch.rb


Open a new console and 'vim classic_sketch.rb' or us another suitable editor

class ClassicSketch < Processing::App
  def setup
    size 200, 200
  end

  def draw

  end
end

# ClassicSketch.new(x: 20, y: 20)

For instant gratification and to relocate the sketch on your display un-comment the last line of the sketch and save (also note this line was "not" required to run the sketch, rp5 run or rp5 watch takes care of creating a new instance of sketch for you). You only use this form to send parameters, such as 'x offset' to your sketch

class ClassicSketch < Processing::App
  def setup
    size 200, 200
  end

  def draw

  end
end

ClassicSketch.new(x: 20, y: 20)
The sketch updates auto-magically...
Already in the works for the next release is the possibility of placing the sketch on your screen using the config file '~/.rp5rc' so this is kind of redundant, but a post initialization hook might get added so you will be able to send all sorts of other parameters. Which are then available by overriding the post_initialization hook method (See Sandi Metz POODR)

Next change the background of your sketch

class ClassicSketch < Processing::App
  def setup
    size 200, 200
  end

  def draw
    background 0
  end
end

ClassicSketch.new(x: 20, y: 20)

Next create a blue box.

class ClassicSketch < Processing::App
  def setup
    size 200, 200
  end

  def draw
    background 0
    fill 0, 0, 200
    rect 40, 50, 120, 100
  end
end

ClassicSketch.new(x: 20, y: 20)


To create class wrapped P3D sketch just "rp5 create classy_sketch 200 200 p3d --wrap" actually it probably doesn't matter where you put the --wrap option after create (but the order of the other variables is important)...

Monday, 7 July 2014

Development plans for ruby-processing

The next release of ruby-processing will likely be version 2.5.0 (current release 2.4.4 using jruby-1.7.12).  The reason why this will not be a minor release is that I intend to incorporate my pre-compiled vecmath and fastmath libraries as developed on JRubyArt. Both these libraries have been created as jruby extensions (they are written in java, but can be loaded into the jruby runtime as ruby). Apart from the possible efficiency gains of using pre-compiled code, the compiled version of vecmath greatly simplifies the use of my ArcBall utility (only one line of code is required to include ArcBall functionality in a sketch).  What I propose to do is to roll back ruby processing commits to the 2.4.4 release, and set that as the stable branch (for the foreseeable future). I see no compelling reasons to issue anymore 2.4 point releases (eg to bump to jruby-1.7.13, and there seems no likelihood of any further processing 2.0 releases, now development has switched up to version 3.0).


JRubyArt has been using the much heralded jruby-9000, but that will only be at a preview release this summer, see tweet:-


Drawolver featuring new libraries, degree precision look up tables, and to_vertex utility for Vec3D:-
# Drawolver: draw 2D & revolve 3D

# Example shows how to use the vecmath library, including AppRender utility.
# On the ruby side features the use each_cons, a possibly a rare use for this 
# ruby Enumerable method?
# 2010-03-22 - fjenett (somewhat revised by Martin Prout 2014-07-06)

load_library :vecmath, :fastmath

attr_reader :drawing_mode, :points, :rot_x, :rot_y, :vertices, :renderer

def setup
  size 1024, 768, P3D
  @renderer = Java::ProcessingVecmath::AppRender.new(self)
  frame_rate 30
  reset_scene
end

def draw
  background 0
  if (!drawing_mode)
    translate(width/2, height/2)
    rotate_x rot_x
    rotate_y rot_y
    @rot_x += 0.01
    @rot_y += 0.02
    translate(-width/2, -height/2)
  end
  no_fill
  stroke 255
  points.each_cons(2) { |ps, pe| line ps.x, ps.y, pe.x, pe.y}

  if (!drawing_mode)
    stroke 125
    fill 120
    lights
    ambient_light 120, 120, 120
    vertices.each_cons(2) do |r1, r2|
      begin_shape(TRIANGLE_STRIP)
      r1.zip(r2).each { |v1, v2| v1.to_vertex(renderer); v2.to_vertex(renderer)}
      end_shape
    end
  end
end

def reset_scene
  @drawing_mode = true
  @points = []
  @rot_x = 0.0
  @rot_y = 0.0
end

def mouse_pressed
  reset_scene
  points << Vec3D.new(mouse_x, mouse_y)
end

def mouse_dragged
  points << Vec3D.new(mouse_x, mouse_y)
end

def mouse_released
  points << Vec3D.new(mouse_x, mouse_y)
  recalculate_shape
end

def recalculate_shape
  @vertices = []
  points.each_cons(2) do |ps, pe|
    b = (points.last - points.first).normalize!
    a = ps - points.first
    dot_product = a.dot b
    b *= dot_product
    normal = points.first + b
    c = ps - normal
    vertices << []
    (0..360).step(12) do |ang|
      e = normal + c * DegLut.cos(ang)
      e.z = c.mag * DegLut.sin(ang)
      vertices.last << e
    end
  end
  @drawing_mode = false
end


Sketch demonstrating use of ShapeRender (ShapeRender and AppRender both implement the Render interface which is used by Vec3D (and Vec2D) to_vertex, to_vertex_uv and to_normal methods, see here for earlier version without using ShapeRender, NB: the FastMath of that version has not survived:
# Trefoil, by Andres Colubri
# A parametric surface is textured procedurally
# by drawing on an offscreen PGraphics surface.
#
# Features (Vec3D).to_normal(renderer) and (Vec3D).to_vertex_uv(renderer, u, v)
# see line 62 for inititialization of renderer where obj is an instance of PShape
# renderer = Java::ProcessingVecmath::ShapeRender.new(obj)

load_library :vecmath

attr_reader :pg, :trefoil

def setup
  size(1024, 768, P3D)

  texture_mode(NORMAL)
  noStroke

  # Creating offscreen surface for 3D rendering.
  @pg = create_graphics(32, 512, P3D)
  pg.begin_draw
  pg.background(0, 0)
  pg.noStroke
  pg.fill(255, 0, 0, 200)
  pg.end_draw

  # Saving trefoil surface into a PShape3D object
  @trefoil = create_trefoil(350, 60, 15, pg)
end

def draw
  background(0)

  pg.begin_draw
  pg.ellipse(rand(0.0 .. pg.width), rand(0.0 .. pg.height), 4, 4)
  pg.end_draw

  ambient(250, 250, 250)
  pointLight(255, 255, 255, 0, 0, 200)

  push_matrix
  translate(width/2, height/2, -200)
  rotate_x(frame_count * PI / 500)
  rotate_y(frame_count * PI / 500)
  shape(trefoil)
  pop_matrix
end

# Code to draw a trefoil knot surface, with normals and texture 
# coordinates. Makes of the Vec3D Render interface (uses ShapeRender here).
# Adapted from the parametric equations example by Philip Rideout:
# http://iphone-3d-programming.labs.oreilly.com/ch03.html

# This function draws a trefoil knot surface as a triangle mesh derived
# from its parametric equation.
def create_trefoil(s, ny, nx, tex)

  obj = create_shape()

  obj.begin_shape(TRIANGLES)
  obj.texture(tex)
  renderer = Java::ProcessingVecmath::ShapeRender.new(obj)
  (0 ... nx).each do |j|
    u0 = j.to_f / nx
    u1 = (j + 1).to_f / nx
    (0 ... ny).each do |i|
      v0 = i.to_f / ny
      v1 = (i + 1).to_f / ny

      p0 = eval_point(u0, v0)
      n0 = eval_normal(u0, v0)

      p1 = eval_point(u0, v1)
      n1 = eval_normal(u0, v1)

      p2 = eval_point(u1, v1)
      n2 = eval_normal(u1, v1)

      # Triangle p0-p1-p2      
      n0.to_normal(renderer)
      (p0 * s).to_vertex_uv(renderer, u0, v0)
      n1.to_normal(renderer)
      (p1 * s).to_vertex_uv(renderer, u0, v1)
      n2.to_normal(renderer)
      (p2 * s).to_vertex_uv(renderer, u1, v1)

      p1 = eval_point(u1, v0)
      n1 = eval_normal(u1, v0)

      # Triangle p0-p2-p1      
      n0.to_normal(renderer)
      (p0 * s).to_vertex_uv(renderer, u0, v0)
      n2.to_normal(renderer)
      (p2 * s).to_vertex_uv(renderer, u1, v1)
      n1.to_normal(renderer)
      (p1 * s).to_vertex_uv(renderer, u1, v0)
    end
  end
  obj.end_shape
  return obj
end

# Evaluates the surface normal corresponding to normalized 
# parameters (u, v)
def eval_normal(u, v)
  # Compute the tangents and their cross product.
  p = eval_point(u, v)
  tangU = eval_point(u + 0.01, v)
  tangV = eval_point(u, v + 0.01)
  tangU -= p
  tangV -= p
  tangV.cross(tangU).normalize! # it is easy to chain Vec3D operations
end

# Evaluates the surface point corresponding to normalized 
# parameters (u, v)
def eval_point(u, v)
  a = 0.5
  b = 0.3
  c = 0.5
  d = 0.1
  s = TAU * u
  t = (TAU * (1 - v)) * 2

  sint = sin(t)
  cost = cos(t)
  sint15 = sin(1.5 * t)
  cost15 = cos(1.5 * t)

  r = a + b * cost15
  x = r * cost
  y = r * sint
  z = c * sint15

  dv = Vec3D.new(
  -1.5 * b * sint15 * cost - y,
  -1.5 * b * sint15 * sint + x,
  1.5 * c * cost15)

  q = dv.normalize     # regular normalize creates a new Vec3D for us
  qvn = Vec3D.new(q.y, -q.x, 0).normalize!  # chained Vec3D operations

  ww = q.cross(qvn)

  coss = cos(s)
  sins = sin(s)

  Vec3D.new(
  x + d * (qvn.x * coss + ww.x * sins),
  y + d * (qvn.y * coss + ww.y * sins),
  z + d * ww.z * sins)
end

Sketch demonstrating new ArcBall utility, all that's needed to allow mousewheel zoom, and mouse drag to rotate the cube (this form uses camera 'under the hood' to centralize the cube in sketch viewpane, alternative form translates the sketch to provided coordinates):-
load_library :vecmath

attr_reader :my_cube

def setup
  size(600, 600, P3D)
  smooth(16)
  ArcBall.init(self)
  @my_cube = create_shape(BOX, 300, 300, 300)
  my_cube.set_fill(color(100, 10, 100))

end

def draw
  background(50, 50, 100)
  define_lights
  lights
  stroke(0)
  shape(my_cube)
end

def define_lights
  ambient(20, 20, 20)
  ambient_light(50, 50, 50)
  point_light(30, 30, 30, 200, -150, 0)
  directional_light(0, 30, 50, 1, 0, 0)
  spot_light(30, 30, 30, 0, 40, 200, 0, -0.5, -0.5, PI / 2, 2)
end

Saturday, 24 May 2014

Extending ruby-processing with built in jruby extensions

A jruby extension need not be a gem (and in some ways extension as gems can be limiting with ruby-processing, as they do not work too easily with jruby-complete) instead it can become a custom or built in library. In the development branch of ruby-processing (fastmath fork) I have created two built in libraries as jruby extensions:-
  1. vecmath, as direct replacement for PVector and incorporation arcball functionality (uses jafama under hood)
  2. fastmath, incorporating degree precision deg/cos lookup table and a wrapper for some jafama functions

For the vecmath I took the advantage of working with java to create arcball functionality using processing reflection calls. I also chose to allow simple Vec3D to vertex and Vec3D to normal (this has got to be most efficient way since it avoids unecessary java to ruby, ruby to java conversions something missing in vanilla processing). Here is a sketch (original by Andrés Colubri) that uses the FastMath sin and cos functions (from jafama) and Vec3D to vertex and Vec3D to normal conversions.
# Trefoil, by Andres Colubri
# A parametric surface is textured procedurally
# by drawing on an offscreen PGraphics surface.

load_libraries :vecmath, :fastmath

attr_reader :pg, :trefoil

def setup
  size(1024, 768, P3D)

  texture_mode(NORMAL)
  noStroke

  # Creating offscreen surface for 3D rendering.
  @pg = create_graphics(32, 512, P3D)
  pg.begin_draw
  pg.background(0, 0)
  pg.noStroke
  pg.fill(255, 0, 0, 200)
  pg.end_draw

  # Saving trefoil surface into a PShape3D object
  @trefoil = create_trefoil(350, 60, 15, pg)
end

def draw
  background(0)

  pg.begin_draw
  pg.ellipse(rand(0.0 .. pg.width), rand(0.0 .. pg.height), 4, 4)
  pg.end_draw

  ambient(250, 250, 250)
  pointLight(255, 255, 255, 0, 0, 200)

  push_matrix
  translate(width/2, height/2, -200)
  rotate_x(frame_count * PI / 500)
  rotate_y(frame_count * PI / 500)
  shape(trefoil)
  pop_matrix
end

# Code to draw a trefoil knot surface, with normals and texture 
# coordinates.
# Adapted from the parametric equations example by Philip Rideout:
# http://iphone-3d-programming.labs.oreilly.com/ch03.html

# This function draws a trefoil knot surface as a triangle mesh derived
# from its parametric equation.
def create_trefoil(s, ny, nx, tex)

  obj = create_shape()
  obj.begin_shape(TRIANGLES)
  obj.texture(tex)

  (0 ... nx).each do |j|
    u0 = j.to_f / nx
    u1 = (j + 1).to_f / nx
    (0 ... ny).each do |i|
      v0 = i.to_f / ny
      v1 = (i + 1).to_f / ny

      p0 = eval_point(u0, v0)
      n0 = eval_normal(u0, v0)

      p1 = eval_point(u0, v1)
      n1 = eval_normal(u0, v1)

      p2 = eval_point(u1, v1)
      n2 = eval_normal(u1, v1)

      # Triangle p0-p1-p2      
      n0.shape_normal(obj)
      pa = p0 * s
      pa.shape_vertex(obj, u0, v0)
      n1.shape_normal(obj)
      pb = p1 * s
      pb.shape_vertex(obj, u0, v1)
      n2.shape_normal(obj)
      pc = p2 * s
      pc.shape_vertex(obj, u1, v1)

      p1 = eval_point(u1, v0)
      n1 = eval_normal(u1, v0)

      # Triangle p0-p2-p1      
      n0.shape_normal(obj)
      pa.shape_vertex(obj, u0, v0)
      n2.shape_normal(obj)
      pc.shape_vertex(obj, u1, v1)
      n1.shape_normal(obj)
      pb = p1 * s
      pb.shape_vertex(obj, u1, v0)
    end
  end
  obj.end_shape
  return obj
end

# Evaluates the surface normal corresponding to normalized 
# parameters (u, v)
def eval_normal(u, v)
  # Compute the tangents and their cross product.
  p = eval_point(u, v)
  tangU = eval_point(u + 0.01, v)
  tangV = eval_point(u, v + 0.01)
  tangU -= p
  tangV -= p

  normUV = tangV.cross(tangU)
  normUV.normalize!
  return normUV
end

# Evaluates the surface point corresponding to normalized 
# parameters (u, v)
def eval_point(u, v)
  a = 0.5
  b = 0.3
  c = 0.5
  d = 0.1
  s = TWO_PI * u
  t = (TWO_PI * (1 - v)) * 2

  r = a + b * FastMath.cos(1.5 * t)
  x = r * FastMath.cos(t)
  y = r * FastMath.sin(t)
  z = c * FastMath.sin(1.5 * t)

  dv = Vec3D.new
  dv.x = -1.5 * b * FastMath.sin(1.5 * t) * FastMath.cos(t) - (a + b * FastMath.cos(1.5 * t)) * FastMath.sin(t)
  dv.y = -1.5 * b * FastMath.sin(1.5 * t) * FastMath.sin(t) + (a + b * FastMath.cos(1.5 * t)) * FastMath.cos(t)
  dv.z = 1.5 * c * FastMath.cos(1.5 * t)

  q = dv
  q.normalize!
  qvn = Vec3D.new(q.y, -q.x, 0)
  qvn.normalize!
  ww = q.cross(qvn)

  pt = Vec3D.new
  pt.x = x + d * (qvn.x * FastMath.cos(s) + ww.x * FastMath.sin(s))
  pt.y = y + d * (qvn.y * FastMath.cos(s) + ww.y * FastMath.sin(s))
  pt.z = z + d * ww.z * FastMath.sin(s)
  return pt
end


For the curious the current version of ruby-processings jruby extensions are available here.

Tuesday, 13 May 2014

Latest processing update

Processing has been updated, quite a few fixes, tested on linux with ruby-processing and it seems to make sense to update your version of processing for use with ruby-processing, just make sure you update the processing root in .rp5rc, to ensure you are using the right version.

Saturday, 1 March 2014

A diagram for ruby-processing

Yukio Morohoshi (hoshi-sano, github twitter) published a helpful diagram for the Japanese audience, here is my take, that I hope is useful...
Schematic outline of ruby-processing (after Yuki Morohoshi)

So ruby-processing kicks off as a two stage process (either MRI or JRuby will do for the 1st stage). Without the -nojruby flag the second stage fires up using the installed jruby. With the -nojruby flag the second stage uses the "vendored" jruby-complete. In both cases the processing jars are added to the classpath.

Saturday, 4 January 2014

Watch mode working again with P3D sketches in JRubyArt

Since this commit to vanilla processing the watch mode is now working in P3D. This was the result of a pull request from Jonathan Feinberg (processing.py), who realised which resources were not being released from such sketches (it was probably even more important for processing.py). It was Jonathans pull request that alerted me to the fact that it would be worth retesting with the latest development version of processing (which pulls his requested fix). Anyway the upshot is this will be automatically fixed for Linux and Windows users when the next version of processing gets released (Mac users if sticking with version 2.0.3 will not be so lucky). There exists a big opportunity for any Mac user brave enough to test the development versions of both processing and JRubyArt (next version of ruby-processing) to test if it can also work for them.
Anyway following my preliminary testing of "watch mode" with JRubyARt I can make the following suggestions to make your sketches more watch friendly:-
  1. Don't have no_loop in your sketch (it might not get updated) 
  2. If using constants use ||= to define them (that way you avoid complaint of already defined constant)
Anyway if you did not remember to do it before, you can (of course) do it in your first "edit" of the sketch.

Followers

About Me

My photo
I have developed JRubyArt and propane new versions of ruby-processing for JRuby-9.1.5.0 and processing-3.2.2