Experiments with ruby-processing (processing-2.2.1) and JRubyArt for processing-3.0

Showing posts with label hemesh. Show all posts

Wednesday, 17 June 2015

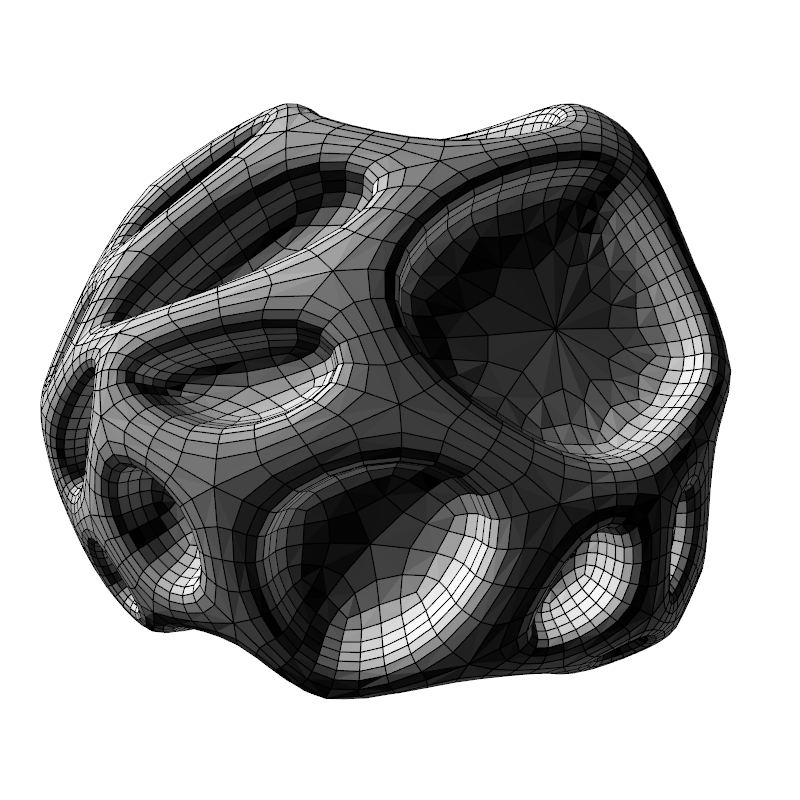
This Hemesh Sketch Forced me to use JRuby Edges

New improved, updated and dried since 22 September 2015

load_library :hemesh

# Module used to include java packages
module MS
  include_package 'wblut.math'
  include_package 'wblut.processing'
  include_package 'wblut.hemesh'
  include_package 'wblut.geom'
end

NUM = 50
attr_reader :mesh, :render, :points

def setup
  sketch_title 'Sponge'
  ArcBall.init(self)
  create_mesh
  @render = MS::WB_Render3D.new(self)
end

def draw
  background(255)
  directional_light(255, 255, 255, 1, 1, -1)
  directional_light(127, 127, 127, -1, -1, 1)
  stroke(0)
  render.draw_edges(mesh)
  no_stroke
  render.draw_faces(mesh)
end

def mouse_pressed
  create_mesh
end

def create_mesh
  rs = MS::WB_RandomOnSphere.new
  creator = MS::HEC_ConvexHull.new
  @points = (0..NUM).map { rs.next_point.mul_self(300.0) }
  creator.set_points(points)
  creator.setN(NUM)
  @mesh = MS::HE_Mesh.new(creator)
  @mesh = MS::HE_Mesh.new(MS::HEC_Dual.new(mesh))
  ext = MS::HEM_Extrude.new.set_chamfer(25).set_relative(false)
  mesh.modify(ext)
  sel = ext.extruded
  ext = MS::HEM_Extrude.new.set_distance(-40)
  mesh.modify_selected(ext, sel)
  mesh.smooth(2)
end

def settings
  size(800, 800, P3D)
  smooth(8)
end

Saturday, 27 April 2013

Hemesh mesh to VBO (PShape) in ruby-processing

Here is a sketch, pretty rich in ruby-processing syntax, including:-
  1. The building of a multi-dimensional array in ruby
  2. The casting of a multi-dimensional ruby array to a java array of float[][]
  3. Using "each" with a java iterator (it is so easy)
  4. Using bit shifting to create a color int
  5. Using the PShape vbo object
  6. A rubified do while block
The sketch:-
load_libraries :hemesh, :vbo

include_package 'wblut.math'
include_package 'wblut.processing'
include_package 'wblut.core'
include_package 'wblut.hemesh'
include_package 'wblut.geom'

RES = 20

attr_reader :mesh_ret, :inv_mesh_ret, :render

def setup
  size(800, 800, P3D)
  smooth(8)
  values = []               # build a multi-dimensional array in ruby
  (0 .. RES).each do |i|    # the inclusive range is intentional here
    valu = []
    (0 .. RES).each do |j|
      val = []
      (0 .. RES).each do |k|
        val << 2.1 * noise(0.35 * i, 0.35 * j, 0.35 * k)
      end
      valu << val
    end
    values << valu
  end

  creator = HEC_IsoSurface.new
  creator.set_resolution(RES,RES, RES) # number of cells in x,y,z direction
  creator.set_size(400.0/RES, 400.0/RES, 400.0/RES) # cell size

  # JRuby requires a bit of help to determine correct 'java args', particulary with 
  # overloaded arrays args as seen below. Note we are saying we have an 'array' of  
  # 'float array' here, where the values can also be double[][][].

  creator.set_values(values.to_java(Java::float[][])) # the grid points

  creator.set_isolevel(1)   # isolevel to mesh
  creator.set_invert(false) # invert mesh
  creator.set_boundary(100) # value of isoFunction outside grid
  # use creator.clear_boundary to set boundary values to "no value".
  # A boundary value of "no value" results in an open mesh

  mesh = HE_Mesh.new(creator)
  # mesh.modify(HEM_Smooth.new.set_iterations(10).setAutoRescale(true))
  creator.set_invert(true)

  inv_mesh = HE_Mesh.new(creator)
  inv_mesh.modify(HEM_Smooth.new.set_iterations(10).set_auto_rescale(true))
  @render = MeshToVBO.new(self)
  no_stroke
  # no color args produces a default light grey fill
  @mesh_ret = render.meshToVBO(mesh, color(200, 0, 0))
  @inv_mesh_ret = render.meshToVBO(inv_mesh, color(0, 0, 200))
end

def draw
  background(120)
  lights
  define_lights
  translate(400, 400)
  rotate_y(mouse_x.to_f / width * TWO_PI)  # use TWO_PI until processing-2.0b9
  rotate_x(mouse_y.to_f / height * TWO_PI) # then we can use TAU
  shape(inv_mesh_ret)
  shape(mesh_ret)
end

def define_lights
  ambient(20, 20, 20)
  ambient_light(60, 60, 60)
  point_light(30, 30, 30, 0, 0, 0)
  directional_light(40, 40, 50, 1, 0, 0)
  spot_light(30, 30, 30, 0, 40, 200, 0, -0.5, 0.5, PI / 2, 2)
end

Here is the mesh to vbo library
# mesh_to_vbo.rb
module MS
  include_package 'java.util'
  include_package 'processing'
  include_package 'processing.core'
  include_package 'wblut.geom'
  include_package 'wblut.hemesh'
end

class MeshToVBO
  include Processing::Proxy
  include MS
  attr_reader :parent

  def initialize(parent)
    @parent = parent
  end

  def meshToVBO(mesh, col = nil)
    tri_mesh = mesh.get
    tri_mesh.triangulate
    retained = parent.create_shape
    retained.begin_shape(TRIANGLES)
    if col
      retained.fill(col)
    else # we will have a light grey color, created by bit shifting
      fcol = (255 >> 24) & 0xFF|(211 >> 16) & 0xFF|(211 >> 8) & 0xFF|211
      retained.fill(fcol)
    end
    retained.ambient(50)
    retained.specular(50)
    mesh.fItr.each do |face|  # call each on the hemesh mesh iterator
      he = face.getHalfedge
      begin      # this block is the ruby equivalent of do while
        vx = he.getVertex
        vn = vx.getVertexNormal
        retained.normal(vn.xf, vn.yf, vn.zf)
        retained.vertex(vx.xf, vx.yf, vx.zf)
        he = he.getNextInFace
      end while (he != face.getHalfedge)
    end
    retained.end_shape
    return retained
  end
end

Using latest hemesh library with latest ruby-processing

Here is an example of using another java processing library with ruby-processing:-
load_library :hemesh

include_package 'wblut.math'
include_package 'wblut.processing'
include_package 'wblut.core'
include_package 'wblut.hemesh'
include_package 'wblut.geom'

 RES=20

attr_reader :mesh, :inv_mesh, :render

def setup
  size(800, 800, P3D)
  smooth(8)
  values = []
  (0 .. RES).each do |i|
    valu = []
    (0 .. RES).each do |j|
      val = []
      (0 .. RES).each do |k|
        val << 2.1*noise(0.35*i, 0.35*j, 0.35*k)
      end
      valu << val
    end
    values << valu
  end

  creator=HEC_IsoSurface.new
  creator.set_resolution(RES,RES, RES)# number of cells in x,y,z direction
  creator.set_size(400.0/RES, 400.0/RES, 400.0/RES) # cell size
  creator.set_values(values.to_java(Java::float[][]))# values corresponding to the grid points
  # values can also be double[][][]
  creator.set_isolevel(1)# isolevel to mesh
  creator.set_invert(false)# invert mesh
  creator.set_boundary(100)# value of isoFunction outside grid
  # use creator.clearBoundary to rest boundary values to "no value".
  # A boundary value of "no value" results in an open mesh

  @mesh=HE_Mesh.new(creator)
  # mesh.modify(HEM_Smooth.new.set_iterations(10).setAutoRescale(true))
  creator.set_invert(true)

  @inv_mesh=HE_Mesh.new(creator)
  inv_mesh.modify(HEM_Smooth.new.set_iterations(10).set_auto_rescale(true))
  @render=WB_Render.new(self)
end

def draw
  background(120)
  lights
  translate(400, 400, 0)
  rotate_y(mouse_x.to_f/width*TWO_PI)  # use TWO_PI until processing-2.0b9
  rotate_x(mouse_y.to_f/height*TWO_PI) # then we can use TAU
  no_stroke
  fill(255,0,0)
  render.draw_faces(inv_mesh)
  stroke(0)
  render.draw_edges(mesh)
  stroke(255,0,0,80)
  render.draw_edges(inv_mesh)
end

Thursday, 2 February 2012

Export ruby-processing sketch to PovRAY mesh2

Updated 8 March hemesh library since 1.70 beta includes export code Here I present how to export from ruby-processing to PovRAY mesh2 format. The beauty of this approach is it does not rely on the processing rendering method, further the mesh2 object is better matched to PovRAY internals then raw triangles so rendering is quicker. However the major advantage is by using the normals calculated by the hemesh library (I'm using svn version 108 here) we get "smooth" surfaces (there is an option to exclude normals and view facets if desired). Here is the ruby processing sketch:-
#######################################################
# twin_iso.rb by Martin Prout aka monkstone
# Original sketch by Frederik Vanhoutte aka wblut
# Using svn(108) hemesh library (wblut)
# to export a ruby-processing sketch)
# to PovRAY mesh2 format (two meshes/one file)
######################################################

load_libraries 'hemesh', 'opengl'
include_package 'wblut.hemesh'
include_package 'wblut.hemesh.core'
include_package 'wblut.hemesh.creators'
include_package 'wblut.hemesh.modifiers'
include_package 'wblut.hemesh.subdividors'
include_package 'wblut.hemesh.tools'
include_package 'wblut.core.processing'

attr_accessor :render, :mesh, :inv_mesh, :display, :creator

def setup()
    size(800, 800, OPENGL)
    @display = true
    res = 20
    count = res + 1
    values=init_array(count, count, count)
    count.times do |i|
        count.times do |j|
            count.times do |k|
                values[i][j][k]=2.1*noise(0.35*i, 0.35*j, 0.35*k)
            end
        end
    end

    @creator=HEC_IsoSurface.new()
    creator.set_resolution(res, res, res)# number of cells in x,y,z direction
    creator.set_size(400.0/res, 400.0/res, 400.0/res) # cell size
    creator.set_values(values.to_java(Java::float[][]))# note cast to Javas
    # values can also be double[][][]
    creator.set_isolevel(1)# isolevel to mesh
    creator.set_invert(false)# invert mesh
    creator.set_boundary(100)# value of isoFunction outside grid
    # use creator.clearBoundary() to rest boundary values to "no value".
    # A boundary value of "no value" results in an open mesh

    @mesh=HE_Mesh.new(creator)
    mesh.modify(HEM_Smooth.new().set_iterations(20).set_auto_rescale(true))
    creator.set_invert(true)

    @inv_mesh=HE_Mesh.new(creator)
    inv_mesh.modify(HEM_Smooth.new().set_iterations(3).set_auto_rescale(true))
    @render=WB_Render.new(self)
end

def draw()
    if (display)
        screen_render()
    else
        povray_render()
    end

end

def screen_render()
    background(120)
    lights()
    translate(400, 400, 0)
    rotate_y(mouse_x*1.0/width*TWO_PI)
    rotate_x(mouse_y*1.0/height*TWO_PI)
    no_stroke()
    fill(255)
    render.draw_faces(mesh)
    fill(255, 0, 0)
    render.draw_faces(inv_mesh)
    stroke(0)
    render.draw_edges(mesh)
    stroke(255, 0, 0, 80)
    render.draw_edges(inv_mesh)
end

def povray_render()
    file_id = "mesh0"
    pw = create_writer(file_id + ".inc")
    HET_Export.saveToPOV(mesh, pw)   # (mesh, pw, false) no normals 
    HET_Export.saveToPOV(inv_mesh, pw)  # default is to use normals (smooth faces)
    pw.flush
    pw.close
    exit
end

def init_array(width, height, depth)
    Array.new(width).map!{ Array.new(height).map!{ Array.new(depth)}}
end

def key_pressed()
    case key
    when 'e', 'E'
        @display = false
    when 's', 'S'
        save_frame("twin_iso.png")
    end
end

Here is the associated "pov" file:-
// Persistence Of Vision Ray Tracer Scene Description File
// File:  Simple Scene <template for povwriter>
// Vers: 3.7
// Date: January 2012
// Auth: Martin Prout 

#version 3.7;

global_settings{
  assumed_gamma 1.0
  radiosity{
    pretrace_start 0.04
    pretrace_end 0.01
    count 200
    recursion_limit 3
    nearest_count 10
    error_bound 0.5
  }
}

#include "colors.inc"
#include "skies.inc"
#include "mesh0.inc"
#include "metals.inc"


//----------------declare scene Settings
#declare camera0 = camera {            // define additional cameras to suit viewing preferences
   location <-1.5, 30.0, -150.0>
   direction <0.0, 0.0, 2.0>
   up  <0.0, 1.0, 0.0>
   right <1.0, 0.0, 0.0>
   look_at <0.0, 25.0, 35.0>
}

#declare light0 = light_source { <100.0, 100.0, -200.0> colour White }

#declare ground0 = plane { <0.0, 1.0, 0.0>, 0.0  // a reflective ground plane
   pigment { NeonBlue }
   finish {reflection 0.15}
}

//------------------end of declare scene settings

// -----------------set the scene

camera { camera0 }              // ------------------------------------------
                                //  The use of declared values makes it possible to easily 
light_source{ light0 }          //  change the way the scene is rendered. Just define an
                                //  additional camera say for your template, and do the
sky_sphere{ S_Cloud3 }          //  substitution here. Retain the original definition and
                                //  you can easily backtrack. Definitions can also be saved
plane{ ground0 }                //  as included file see colors.inc for an example.
                                // ---------------------------------------------  
// -----------------end set the scene
object{
mesh2{ obj0 }                  // name obj0 created by modified Hemesh library
texture {T_Silver_5E}
scale<0.3, 0.3, 0.3>
rotate<0, 15, 0>
translate<0, 50, 400>
}

object{
mesh2{ obj2 }                  // name obj2 created by modified Hemesh library (why not 1?)
texture {T_Copper_1A}
scale<0.3, 0.3, 0.3>
rotate<0, 15, 0>
translate<0, 50, 400>
}
PovRAY rendered


Opengl Rendered

Monday, 2 May 2011

Using Hemesh Library in ruby-processing

It has been positively ages since I last posted any ruby-processing sketches here is one processing library that you might like to experiment with it is the Hemesh library by Frederik Vanhoutte aka W:Blut. Over on my other blog I have been describing the development of my latest processing library "povwriter" a tool for exporting processing sketches to the povray format and this is one of the sketches I have used.  Next I will attempt to get my "povwriter" library working in ruby processing.


# RandomCage.rb is a processing sketch that shows
# how you can use the Hemesh library in Ruby-Processing.


class RandomCage < Processing::App
  load_libraries 'hemesh', 'opengl'
  include_package 'wblut.hemesh'
  include_package 'wblut.hemesh.creators'
  include_package 'wblut.hemesh.iterators'
  include_package 'wblut.hemesh.modifiers'
  include_package 'wblut.hemesh.subdividors'

  import "processing.opengl"

  full_screen
  TWO_PI = Math::PI * 2
  attr_reader :cage

  def setup
    configure_opengl
    @cage = HE_Mesh.new(HEC_Box.new(self).set_depth(height/2).set_height(height/2).set_width(height/2))
    @cage.modify(HEM_ChamferCorners.new.set_distance(height*0.1))
    #HES_Planar() subdivision can include a measure of randomness
    @cage.subdivide(HES_Planar.new.set_random(true).set_range(0.4),2)
 
    #A save choice after introducing any kind of randomness is to triangulate possible concave faces.
    #Concave faces do not invalidate the mesh but can give unexpected results.
    @cage.triangulate_concave_faces()
 
    @cage.modify(HEM_Lattice.new.set_depth(0.016*height).set_width(0.016*height).set_fuse(true))
    sel = HE_Selection.new
    for f in cage.f_itr        # using ruby syntax here
      sel.add f
    end
    cage.subdivide_selected(HES_CatmullClark.new(),sel,2)
  end


  def draw
    background(120)
    lights
    translate(width/2, height/2)
    rotate_y(mouse_x * 1.0  / width * TWO_PI - Math::PI)
    rotate_x(mouse_y * 1.0 / height * TWO_PI - Math::PI)
    fill(255)
    no_stroke
    cage.draw_faces
    stroke(0)  
    cage.draw_edges
  end

  def configure_opengl
    render_mode OPENGL
    hint ENABLE_OPENGL_4X_SMOOTH     # optional
    hint DISABLE_OPENGL_ERROR_REPORT # optional
  end

end


Followers

About Me

My photo
I have developed JRubyArt and propane new versions of ruby-processing for JRuby-9.1.5.0 and processing-3.2.2